
How to make icons for the Web [part 2]
Part II: Image sprite with Compass
In the previous part of this tutorial (“Create and optimize for Retina”), we created our icons and exported them as optimized image files. Now, we want to integrate these images in our web project.
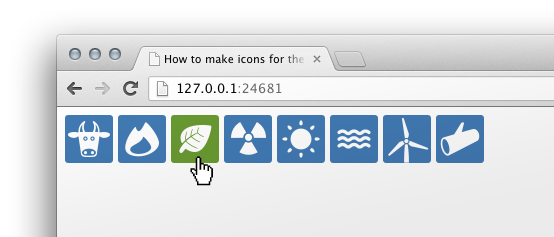
Here’s what we want as a result: demonstration
Step 1: Create a Compass project
Compass is a CSS pre-processor based on SASS. It runs on any computer that has ruby installed. To install Compass, simply follow these instructions: http://compass-style.org/install/.
$ gem install compass
$ compass create <myproject>
For those who don’t the command line, it’s possible to simply download and install the Compass.app or the Fire.app, those very helpfuls GUIs compile your Compass project to standard HTML/CSS automatically.
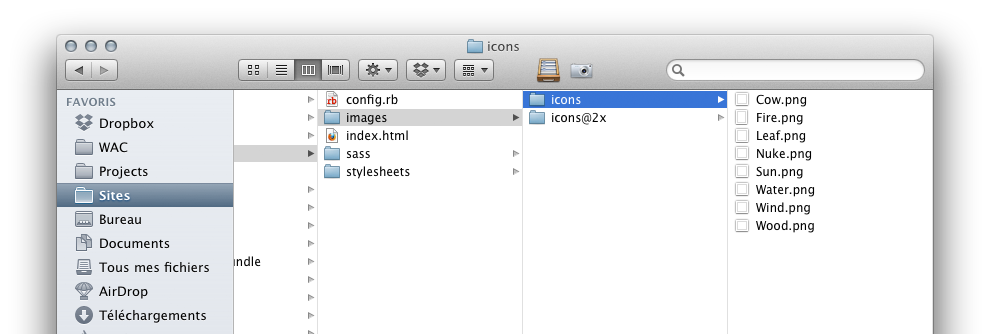
By creating a new Compass project, you will have a basic folder structure. Just put your icons files at normal size in “images/icons”, and the retina icons in “images/icons@2x”:
Step 2: HTML Structure
In our HTML file, we need to load the CSS and add tags for the icons:
<html>
    <head>
    <title>How to make icons for the Web</title>

        <link media="screen" href="stylesheets/screen.css" type="text/css" rel="stylesheet">

    </head>
    <body>


    <a href="#" class="icon icon-Cow"></a>
    <a href="#" class="icon icon-Fire"></a>
    <a href="#" class="icon icon-Leaf"></a>
    <a href="#" class="icon icon-Nuke"></a>
    <a href="#" class="icon icon-Sun"></a>
    <a href="#" class="icon icon-Water"></a>
    <a href="#" class="icon icon-Wind"></a>
    <a href="#" class="icon icon-Wood"></a>

    </body>
</html>
Step 3: Generating the image sprite
Now we want to create a single image sprite, that contains all our icons. Along with that we’ll get css selectors for every icon.
We will use the Compass Sprite helpers to do that: http://compass-style.org/reference/compass/helpers/sprites/.
In screen.scss, we import compass:
// Imports
//--------------------------------------------------------------------
@import "compass";
We can customize the sprite. A lot of parameters are allowed, see the Compass documentation.
// Parameters
//--------------------------------------------------------------------

// The space between the icons to avoid unwanted pixels
$icons-spacing: 10px;

// The layout lets us choose the orientation of the generated image
$icons-layout: horizontal;
Then we pass our parameters and the folder-urls to the sprite-map-helper:
// Import sprite at normal size
$sprites: sprite-map("icons/*.png", $new-position: 100%, $spacing: $icons-spacing, $layout: $icons-layout, $new-repeat: no-repeat);

// Import sprite at 2x size
$sprites2x: sprite-map("icons@2x/*.png", $new-position: 100%, $spacing: $icons-spacing, $layout: $icons-layout, $new-repeat: no-repeat);
Now, we adapt a mixin writed by Adam Brodzinski for our needs (on github: https://github.com/AdamBrodzinski/Retina-Sprites-for-Compass)
// Mixin
//--------------------------------------------------------------------

@mixin sprite-retina($name, $sprites: $sprites, $sprites2x: $sprites2x, $dimensions: true, $pad: 0) {

    // Give width and height of the icon file
    @if $dimensions == true {
        @include sprite-dimensions($sprites, $name);
        }

    // Compass mixins
    background-image: sprite-url($sprites);
    background-position: sprite-position($sprites, $name, -$pad, -$pad);
    background-repeat: no-repeat;

    // The $pad is the padding the element will have (requires $spacing on the sprite maps), it's great for iPhone interfaces to make hit areas bigger
    @if $pad > 0 {
        padding: $pad;
    }

    // A media query to target Retina Displays
    @media (-webkit-min-device-pixel-ratio: 1.5), (min--moz-device-pixel-ratio: 1.5), (-o-min-device-pixel-ratio: 3/2), (min-device-pixel-ratio: 1.5) {
        &{
        // The name of our big icons is followed by "@2x"
        $name2x: $name+"@2x";
        $pos: sprite-position($sprites2x, $name2x, -$pad * 2, -$pad * 2);

        background-image: sprite-url($sprites2x);
        background-position: (nth($pos, 1)/2) (nth($pos, 2)/2);
        @include background-size(ceil(image-width(sprite-path($sprites2x)) / 2) auto);
        // sprite-path() returns the path of the generated sprite sheet, which image-width() calculates the width of. the ceil() is in place in case you have sprites that have an odd-number of pixels in width
        }
    }
}
Important: with copy/paste, you have to change the &038; in “&”.
Finally, we just have to call the “sprite-retina” mixin for each icon with a loop:
// Selector
//--------------------------------------------------------------------

.icon {

    // Basic styles for our icons
    display:block;
    float:left;
    margin-right: 5px;

    // A Sass loop with our icons names
    @each $myIcon in Cow, Fire, Leaf, Nuke, Sun, Water, Wind, Wood {

        // The #{} let us use variables in the selector
        &.icon-#{$myIcon} {

            // And the mixin
            @include retina-sprite(#{$myIcon});
        }
    }
}
Refreshing a page will normally automatically generate an image Sprite in our folder:

We can also add an Hover state:
// Hover
.icon:hover {
    background-color: #6a9a32;
}
And that’s it! We made a cool set of icons, we can easily evolve and manage.
Download the files
All the files are available on GitHub